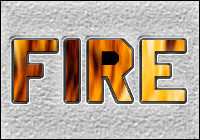
ps如何做動畫火焰文字
來源:未知
作者:學photoshop
學習:1337人次
步驟一.
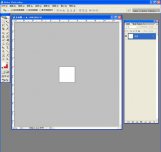
新建500*400大小背景為白色文檔.
設定前景色為黑色.
執(zhí)行濾鏡.渲染 纖維.
詳細參數(shù)為圖:1 再執(zhí)行濾鏡 模糊 高斯模糊.參數(shù)為0.5左右

步驟二.
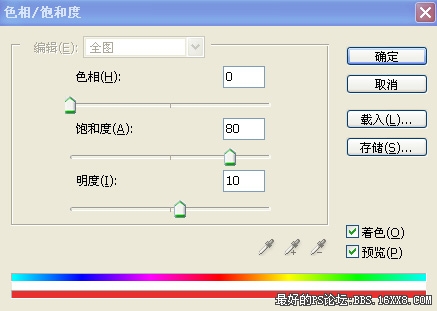
按Ctrl+U調整,色相飽和度.詳細參數(shù)為圖2
調好之后.復制該圖層.按Ctrl+U調整,色相飽和度.詳細參數(shù)如圖3.并把疊加模式改為線性減淡.透明度為60%左右.
步驟三.
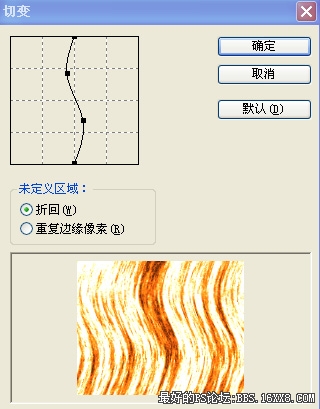
合并所有圖層.執(zhí)行濾鏡 扭曲 切變.調整如圖3所示
,
步驟四.(這步比較關鍵)
雙擊該圖層.將該圖層轉換為普通層.再復制該圖層.將兩個圖層移動位置如圖4所示.
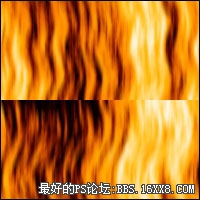
再用像皮工具擦除下面那層的頂端部分.如兩個圖層看起來更好融合為一張圖.如圖5-6所示


photoshop教程
步驟五.
再將這兩圖層合并.進入IR 點擊動畫,把圖層中的火焰往下拖到,剛好填滿整個圖層.
再新建幀.把圖層中的火焰往上拖.也拖到最好低填層. 再選中第一幀.按右上角的小按鈕.選擇過渡:過渡下一幀.如圖7所示.
最終效果如圖7所示.(你也可以上個文字層上面做個遮罩如圖8)
新建500*400大小背景為白色文檔.
設定前景色為黑色.
執(zhí)行濾鏡.渲染 纖維.
詳細參數(shù)為圖:1 再執(zhí)行濾鏡 模糊 高斯模糊.參數(shù)為0.5左右
步驟二.
按Ctrl+U調整,色相飽和度.詳細參數(shù)為圖2
調好之后.復制該圖層.按Ctrl+U調整,色相飽和度.詳細參數(shù)如圖3.并把疊加模式改為線性減淡.透明度為60%左右.
步驟三.
合并所有圖層.執(zhí)行濾鏡 扭曲 切變.調整如圖3所示
,
步驟四.(這步比較關鍵)
雙擊該圖層.將該圖層轉換為普通層.再復制該圖層.將兩個圖層移動位置如圖4所示.
再用像皮工具擦除下面那層的頂端部分.如兩個圖層看起來更好融合為一張圖.如圖5-6所示
photoshop教程
步驟五.
再將這兩圖層合并.進入IR 點擊動畫,把圖層中的火焰往下拖到,剛好填滿整個圖層.
再新建幀.把圖層中的火焰往上拖.也拖到最好低填層. 再選中第一幀.按右上角的小按鈕.選擇過渡:過渡下一幀.如圖7所示.
最終效果如圖7所示.(你也可以上個文字層上面做個遮罩如圖8)
- 相關教程
- TA的教程
- 收藏
- 返回
- 學photoshop
學習 · 提示
- 發(fā)評論 | 交作業(yè) -
最新評論
wjb2032012-05-12 07:18
學習學習!
回復
小橋djjj2012-04-14 09:59
dingding本文來自:ps教程論壇(bbs.16xx8.com)詳細出處參考:http://bbs.16xx8.com/thread-78433-1-1.htmlding本文來自:ps教程論壇(bbs.16xx8.com)詳細出處參考:http://bbs.16xx8.com/thread-78433-1-1.html
相關教程
關注大神微博加入>>


![[IR動圖教程] 菜鳥學飛:打造轉轉風車動畫](http://pic.16xx8.com/article/UploadPic/2007/10/29/2007102991227105_lit.gif)
網(wǎng)友求助,請回答!